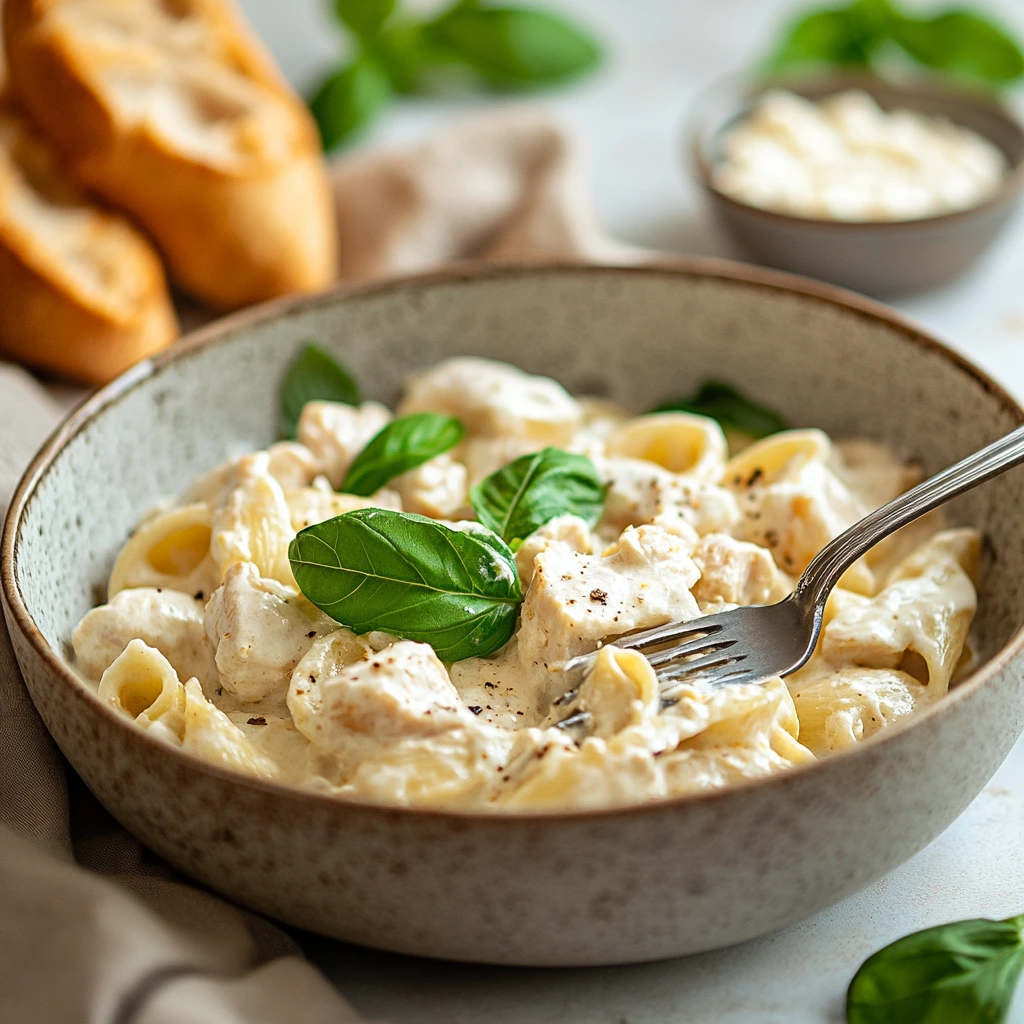
There’s something incredibly satisfying about a creamy, cheesy pasta dish, and this Creamy Ricotta Chicken Pasta is the ultimate comfort food! This recipe combines tender, juicy chicken thighs, al dente penne pasta, and a rich, creamy ricotta sauce, all tied together with the bold flavors of garlic, Parmesan, and fresh basil. It’s quick, easy, and perfect for busy weeknights when you crave something indulgent but don’t want to spend hours in the kitchen.
Whether you’re looking for a family-friendly dinner, a cozy date-night meal, or a satisfying dish for meal prep, this creamy ricotta pasta delivers on taste, texture, and simplicity. Plus, it’s budget-friendly and requires minimal ingredients, making it a great go-to dish for any occasion.
Why You’ll Love This Recipe 💡
✔ Rich & Creamy Texture – The ricotta cheese creates a luxurious, velvety sauce that coats every bite of pasta.
✔ Protein-Packed – Chicken thighs add a hearty, protein-rich element to keep you full and satisfied.
✔ Easy & Quick – This dish comes together in under 30 minutes, making it perfect for busy weeknights.
✔ Versatile & Customizable – Easily adjust the ingredients to fit dietary preferences (gluten-free, vegetarian, or low-carb).
✔ Restaurant-Quality Flavor – With fresh garlic, Parmesan, and basil, this pasta tastes like something from a high-end Italian restaurant!
Ingredients Needed 🛒
To make this delicious creamy ricotta chicken pasta, you’ll need:
For the Pasta & Chicken:
- 8 oz penne pasta (or your favorite pasta shape)
- 1 lb chicken thighs, sliced into strips
- 1 tbsp olive oil
- Salt & pepper to taste
For the Creamy Ricotta Sauce:
- 1 cup ricotta cheese (full-fat for extra creaminess)
- 2 cloves garlic, minced
- ½ cup grated Parmesan cheese
- ¼ cup fresh basil, chopped
- ¼ tsp red pepper flakes (optional for a little heat)
Equipment Needed 🏺
- Large pot for boiling pasta
- Large skillet or sauté pan
- Tongs for flipping chicken
- Wooden spoon for stirring
- Strainer for draining pasta
Step-by-Step Instructions 🍳
Step 1: Cook the Pasta
- Bring a large pot of salted water to a boil. Add the penne pasta and cook according to package instructions until al dente.
- Reserve ½ cup of pasta water, then drain and set aside.
Step 2: Cook the Chicken
- Heat olive oil in a large skillet over medium-high heat.
- Season the sliced chicken thighs with salt & pepper.
- Add the chicken to the skillet and sear for 4-5 minutes per side until fully cooked and golden brown. Remove from the pan and set aside.
Step 3: Prepare the Ricotta Sauce
- Lower the heat to medium and add the minced garlic to the same pan. Sauté for 30 seconds until fragrant.
- Stir in the ricotta cheese, Parmesan, and a splash of reserved pasta water to create a smooth sauce.
- Add the chopped basil and red pepper flakes for extra flavor.
Step 4: Combine Everything
- Return the cooked pasta and chicken to the pan.
- Toss everything together until the pasta is evenly coated in the creamy ricotta sauce.
- If needed, add more pasta water to loosen the sauce.
Step 5: Serve & Garnish
- Divide the Creamy Ricotta Chicken Pasta into bowls.
- Garnish with extra Parmesan, fresh basil, and black pepper.
- Serve hot and enjoy this comforting, creamy pasta dish!
Tips for the Best Results 🔥
✔ Use Fresh Ingredients – Fresh basil, garlic, and Parmesan elevate the dish’s flavors.
✔ Don’t Overcook the Chicken – Chicken thighs stay juicier when cooked until just golden brown.
✔ Reserve Pasta Water – This helps loosen the sauce and makes it extra creamy.
✔ Use High-Quality Ricotta – A full-fat, high-quality ricotta makes all the difference in texture and flavor.
Variations & Customizations 🌿
🌾 Gluten-Free Option: Swap regular pasta for gluten-free penne or chickpea pasta.
🍗 Protein Swap: Replace chicken thighs with shrimp, turkey, or tofu for a different twist.
🥦 Add More Veggies: Stir in spinach, roasted bell peppers, or mushrooms for added nutrients.
🌶 Spicy Kick: Increase the red pepper flakes or add a dash of cayenne pepper for extra heat.
🧄 Garlic Lovers: Double the garlic for an extra flavorful experience.
Serving Suggestions 🍽️
This Creamy Ricotta Chicken Pasta pairs well with:
🥗 Side Salad: A light arugula or Caesar salad complements the creamy pasta.
🍞 Garlic Bread: Serve with crispy garlic bread or rosemary focaccia.
🍷 Beverage Pairing: Enjoy with a refreshing lemonade, sparkling water, or iced tea.
Storage & Reheating Instructions ❄️
- To Store: Keep leftovers in an airtight container in the fridge for up to 3 days.
- To Reheat: Warm in a pan over medium heat, adding a splash of milk or cream to restore creaminess.
- To Freeze: Store in a freezer-safe container for up to 2 months. Thaw overnight in the fridge before reheating.
Frequently Asked Questions (FAQs) ❓
Can I make this recipe ahead of time?
Yes! Cook everything ahead and store it in the fridge. Reheat with a bit of cream or milk to refresh the sauce.
What’s the best pasta for this dish?
Penne works great, but you can use rigatoni, fusilli, or spaghetti.
Can I make it vegetarian?
Yes! Skip the chicken and add roasted mushrooms or zucchini for a delicious vegetarian version.
Is there a dairy-free alternative?
You can use dairy-free ricotta and Parmesan alternatives. Coconut cream works as a substitute for heavy cream.
Nutritional Information 🥗 (Per Serving Estimate)
- Calories: ~550 kcal
- Protein: ~40g
- Carbs: ~45g
- Fats: ~25g
Common Mistakes & How to Avoid Them ❌➡✅
When preparing this dish, there are a few common mistakes that can affect the final result, but they are easy to avoid with the right techniques. One of the most frequent errors is overfilling the tortillas, which makes rolling them difficult and causes the filling to spill out while baking. To prevent this, use just the right amount of filling to ensure they stay intact. Another common issue is using store-bought shredded cheese instead of freshly grated cheese. Pre-packaged shredded cheese often contains anti-caking agents that prevent it from melting smoothly, leading to a less creamy texture. Opt for freshly grated cheese for a rich, gooey consistency. Additionally, not rolling the tortillas tightly enough can result in them unraveling during baking. A secure roll ensures they hold their shape and maintain the desired structure. Lastly, baking at the wrong temperature can either dry out the tortillas or leave the cheese under-melted. Always follow the recommended temperature and keep an eye on them while baking to achieve the perfect golden-brown finish.
Health Benefits of This Recipe 🥦
This dish is not only delicious but also packed with health benefits. The protein from the cheese and other ingredients helps keep you full and supports muscle growth, making it an excellent choice for those following a high-protein or low-carb diet. For those on a keto lifestyle, this dish aligns well due to its high-fat content, which provides sustained energy and keeps cravings at bay.
Cheese is also a great source of calcium, which is essential for strong bones and teeth. Homemade meals like this one are always a healthier option compared to store-bought versions because they allow you to control the ingredients, avoiding unnecessary preservatives, excess sodium, and unhealthy additives. The inclusion of fresh ingredients adds valuable nutrients, ensuring you enjoy a flavorful and nutrient-dense meal.
Ingredient Spotlight 🌟
One of the standout ingredients in this recipe is cheese, which plays a crucial role in adding flavor, creaminess, and texture. Cheese is an excellent choice for those on a low-carb or keto diet because it provides high amounts of healthy fats while keeping carbohydrate intake minimal. It also contains protein, which helps with muscle maintenance and satiety.
The calcium in cheese supports bone health, while the presence of essential vitamins such as vitamin A and B12 contribute to overall wellness. If you need an alternative, you can opt for dairy-free cheese for a plant-based version, or use a combination of different cheeses like mozzarella, cheddar, or gouda to create a unique depth of flavor that suits your taste preferences.
How to Make This Recipe Kid-Friendly 👶
Making this recipe appealing to children is simple with a few modifications. Cutting the roll-ups into smaller, bite-sized pieces makes them easier for little hands to hold and eat. Using mild cheeses instead of sharp or spicy ones ensures that the flavor is more kid-friendly. Additionally, offering a variety of dipping sauces, such as mild marinara, ranch, or a yogurt-based dip, can make the dish more fun and interactive for children.
If your child is a picky eater, you can also add finely chopped vegetables into the filling to incorporate more nutrients without altering the taste too much. Making the cooking process interactive by allowing kids to help assemble and roll the tortillas can also make them more excited about eating the dish.
How to Pair This Dish with Other Low-Carb Foods 🍽️
This dish pairs wonderfully with a variety of low-carb sides and beverages to create a well-balanced meal. A fresh green salad with a light vinaigrette dressing provides a refreshing contrast to the richness of the cheese-filled roll-ups. Roasted vegetables such as zucchini, bell peppers, or asparagus add a healthy, fiber-rich component while keeping the meal low in carbs. If you’re looking for a heartier side, cauliflower rice or mashed cauliflower is a fantastic option that complements the flavors well.
For beverages, consider a keto-friendly smoothie or infused water with lemon and mint for a refreshing touch. Serving the roll-ups with a warm, low-carb soup, such as a creamy tomato or roasted red pepper soup, enhances the overall meal experience while keeping it healthy and satisfying.
FINAL THOUGHTS
This recipe is a delicious and versatile dish that can be enjoyed by the whole family. With a few simple adjustments, it can cater to different dietary needs, making it a go-to option for a quick and satisfying meal. By avoiding common mistakes, you can achieve the best texture and flavor every time you make it. The health benefits of using fresh, whole ingredients make it a nutritious choice, especially for those following a keto or low-carb lifestyle.
Highlighting the key ingredients allows you to appreciate their nutritional value, while kid-friendly modifications ensure that even picky eaters will love this dish. Pairing it with the right sides enhances the overall dining experience, making it a complete and balanced meal. Whether served as an appetizer, snack, or main course, this dish is sure to impress with its cheesy, flavorful goodness.
Related Recipes 🍛
🍝 Velveeta Beef & Bowtie Pasta – Another creamy and satisfying pasta dish!
🥗 Lemon Herb Chicken Salad – A refreshing and protein-packed salad option.
🧀 Cheesy Baked Ziti – A rich, cheesy, and comforting pasta bake.
📲 Follow for more delicious recipes!