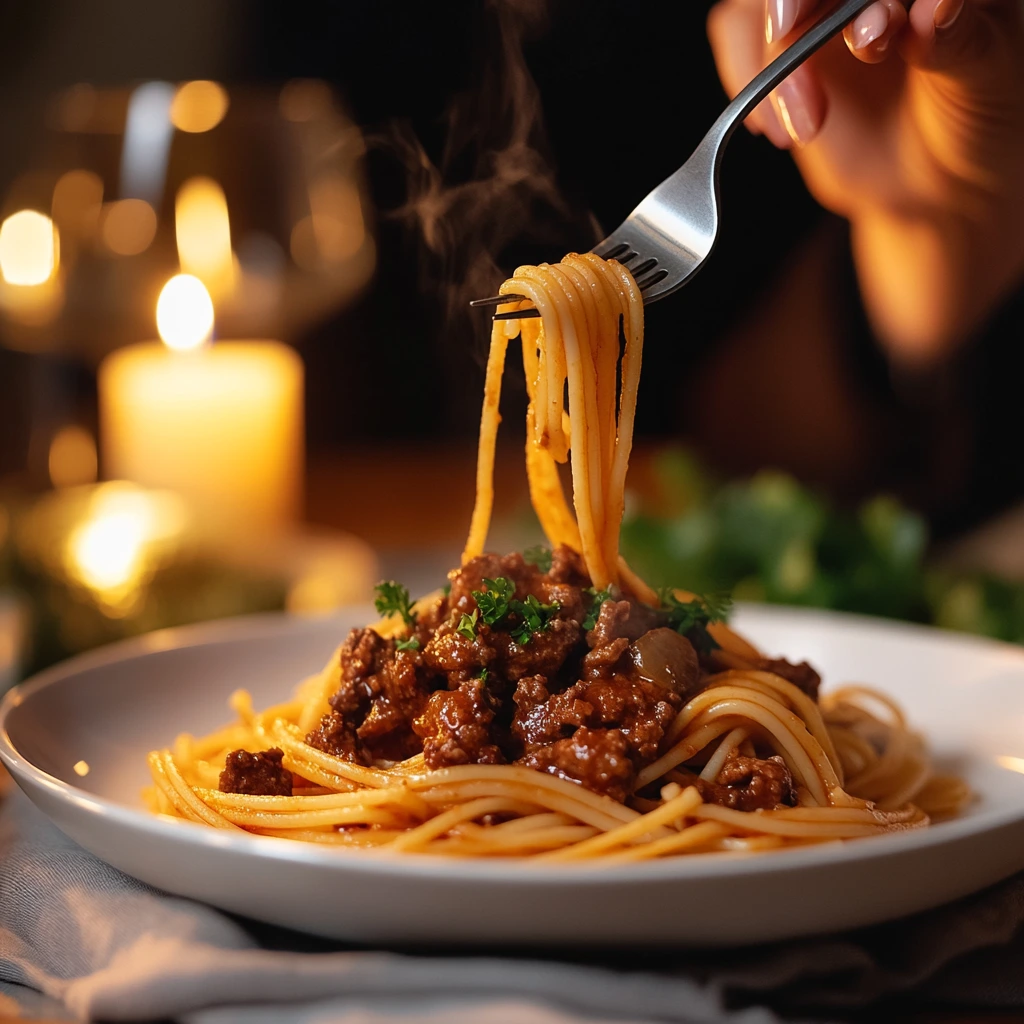
When it comes to a satisfying, flavor-packed meal that is easy to prepare, Garlic Beef Pasta is the perfect choice. This dish combines tender slices of beef sirloin with aromatic garlic and a hint of spice from red chili flakes, all tossed with perfectly cooked spaghetti. It’s a quick, budget-friendly meal that is ideal for busy weekdays or a cozy weekend lunch. The rich umami flavor from soy sauce, combined with the freshness of chopped parsley, makes this dish a standout. Whether you’re looking for a hearty meal or a simple yet elegant dish to impress your family, this Garlic Beef Pasta recipe is guaranteed to be a favorite.
Why You’ll Love This Recipe 💡
✔ Quick & Easy – Ready in under 30 minutes, making it ideal for lunch. ✔ Budget-Friendly – Uses simple, affordable ingredients that you may already have. ✔ Rich & Bold Flavors – A combination of garlic, soy sauce, and chili flakes creates an irresistible taste. ✔ Customizable – Adjust spice levels and add extra vegetables for a personalized touch. ✔ Protein-Packed – Loaded with high-quality beef protein for a satisfying and nutritious meal.
Ingredients Needed 🛒
- 8 oz spaghetti – Cooked to al dente for the perfect texture.
- 1 lb beef sirloin, thinly sliced – Tender, flavorful, and packed with protein.
- 4 cloves garlic, minced – The key ingredient for an aromatic, bold flavor.
- 1 tbsp olive oil – Helps sear the beef and prevents sticking.
- 2 tbsp soy sauce – Adds umami richness to the dish.
- 1 tsp red chili flakes – Provides a mild heat for extra flavor.
- 1/4 cup chopped parsley – Brings freshness and color.
- Salt and pepper to taste – Enhances and balances all the flavors.
Equipment Needed 🏺
✔ Large pot for boiling spaghetti. ✔ Skillet or pan for cooking the beef and garlic. ✔ Cutting board and knife for slicing beef and chopping parsley. ✔ Tongs for tossing pasta with sauce. ✔ Strainer for draining pasta.
Step-by-Step Instructions 🍳
1️⃣ Cook the Spaghetti
- Bring a large pot of salted water to a boil.
- Add spaghetti and cook until al dente, according to package instructions.
- Drain and set aside, reserving 1/2 cup of pasta water for later use.
2️⃣ Sear the Beef
- Heat 1 tbsp olive oil in a large skillet over medium-high heat.
- Add the thinly sliced beef sirloin and season with salt and pepper.
- Sear for 2-3 minutes per side until browned and cooked through.
- Remove the beef from the skillet and set aside.
3️⃣ Sauté the Garlic
- In the same skillet, add the minced garlic and cook for 30 seconds until fragrant.
- Sprinkle in red chili flakes and stir for another 15 seconds.
4️⃣ Combine the Ingredients
- Return the cooked beef to the skillet and pour in the soy sauce.
- Toss everything together, ensuring the beef is well coated.
- Add the cooked spaghetti to the pan, along with a splash of reserved pasta water.
- Stir well to combine, allowing the flavors to meld.
5️⃣ Finish & Serve
- Garnish with freshly chopped parsley.
- Serve immediately and enjoy!
Tips for the Best Results 🔥
✔ Use Fresh Garlic – Freshly minced garlic delivers the best flavor. ✔ Slice Beef Thinly – Thinly sliced beef ensures quick and even cooking. ✔ Don’t Overcook Garlic – Garlic burns quickly, so sauté it just until fragrant. ✔ Reserve Pasta Water – Helps to create a silky sauce that coats the pasta beautifully. ✔ Add More Spice – Increase chili flakes for extra heat.
Variations & Customizations 🌿
- Gluten-Free: Use gluten-free spaghetti and tamari instead of soy sauce.
- Vegetarian: Swap beef for mushrooms or tofu for a plant-based alternative.
- Extra Veggies: Add bell peppers, spinach, or zucchini for more nutrients.
- Cheesy Option: Sprinkle grated Parmesan on top for a cheesy twist.
- Low-Carb: Serve over zucchini noodles or cauliflower rice instead of spaghetti.
Serving Suggestions 🍽️
- Fresh Side Salad – A crisp green salad with balsamic vinaigrette pairs well.
- Garlic Bread – Serve with warm garlic bread for an extra indulgence.
- Steamed Vegetables – Lightly steamed broccoli or asparagus adds a nutritious touch.
- Iced Tea or Lemonade – Refreshing beverages that complement the dish’s flavors.
Storage & Reheating Instructions ❄️
- Refrigerate: Store leftovers in an airtight container for up to 3 days.
- Freeze: Freeze for up to 2 months; thaw in the refrigerator before reheating.
- Reheat: Warm in a skillet over medium heat with a splash of water or broth to restore moisture.
Frequently Asked Questions (FAQs) ❓
Can I use a different type of pasta?
Yes! Spaghetti works well, but fettuccine, linguine, or penne are great alternatives.
How can I make this less spicy?
Reduce or omit the red chili flakes for a milder taste.
Can I use chicken instead of beef?
Absolutely! Thinly sliced chicken breast is a great substitute.
What if I don’t have fresh parsley?
You can use dried parsley, but fresh is recommended for the best flavor.
Is this dish keto-friendly?
To make it keto, swap spaghetti for zucchini noodles or shirataki noodles.
Useful Links 🔗
- Related Recipes:
- External Links:
Common Mistakes & How to Avoid Them ❌➡✅
When making this dish, several common mistakes can affect the final outcome. One of the most frequent errors is overfilling the tortillas, which makes them difficult to roll and causes the filling to spill out during baking. To avoid this, use a moderate amount of filling and spread it evenly to ensure a tight roll-up. Another mistake is using store-bought shredded cheese instead of freshly grated cheese. Pre-shredded cheese often contains anti-caking agents that prevent it from melting smoothly. Opt for freshly grated cheese for a creamier, more flavorful result.
Additionally, many people fail to roll the tortillas tightly enough, which can cause them to unravel during baking. Secure each roll-up by tucking in the edges as you roll. Baking at the wrong temperature is another common issue. Too high a temperature can cause the tortillas to burn before the cheese fully melts, while too low a temperature may result in undercooked fillings. Always preheat your oven and bake at the recommended temperature for the best results. Lastly, neglecting to brush the tortillas with oil or butter can lead to dry, less flavorful roll-ups. A light coating of oil enhances crispiness and ensures an even golden-brown finish.
Health Benefits of This Recipe 🥦
This recipe offers a variety of health benefits, making it a great option for those following a balanced diet. The low-carb tortillas used in the roll-ups make this dish a suitable choice for individuals on a keto or low-carb lifestyle. Cheese provides a good source of healthy fats and protein, which help keep you full and satisfied while maintaining stable blood sugar levels. The inclusion of fresh ingredients, such as vegetables or lean meats, can boost the dish’s nutritional value by adding essential vitamins and minerals.
Unlike store-bought processed meals, homemade roll-ups allow you to control the ingredients, ensuring that no unnecessary preservatives or additives are included. By choosing high-quality, natural ingredients, you can enjoy a delicious meal that supports overall health and wellness.
Ingredient Spotlight 🌟
One of the key ingredients in this recipe is cheese, which not only enhances the flavor but also contributes to the dish’s creamy texture. Cheese is an excellent source of calcium, which is essential for strong bones and teeth. It also contains high-quality protein that supports muscle growth and repair. For those following a low-carb or keto diet, cheese is an ideal ingredient due to its low carbohydrate content and high fat content, which helps with satiety and energy levels.
If you need an alternative to dairy cheese, consider using plant-based cheese options made from cashews or almonds for a similar creamy texture. Additionally, if you prefer a lighter version, opt for reduced-fat cheese to lower the overall calorie content while maintaining the flavor and consistency of the dish.
How to Make This Recipe Kid-Friendly 👶
Making this recipe more appealing for children can be simple and fun. One way to ensure kids enjoy it is by cutting the roll-ups into smaller, bite-sized pieces, making them easier to eat and more visually appealing. Using mild cheeses instead of sharp or aged varieties can make the dish more palatable for young taste buds.
Additionally, incorporating fun dipping sauces such as ranch, marinara, or a light yogurt-based dip can encourage children to try new flavors. Another way to make the roll-ups kid-friendly is by adding familiar ingredients like finely chopped chicken, turkey, or mild vegetables such as bell peppers or spinach. Getting kids involved in the preparation process, such as allowing them to sprinkle the cheese or roll the tortillas, can also make them more excited to eat the final dish.
How to Pair This Dish with Other Low-Carb Foods 🍽️
To create a well-balanced low-carb meal, consider pairing these roll-ups with complementary side dishes and beverages. A fresh salad with leafy greens, cherry tomatoes, and a light vinaigrette provides a refreshing contrast to the rich, cheesy roll-ups. Roasted or grilled vegetables, such as zucchini, asparagus, or bell peppers, add extra nutrients and fiber while keeping the meal low in carbohydrates.
For those looking for a heartier meal, serving the roll-ups with a warm, comforting keto-friendly soup, such as creamy tomato or broccoli cheddar, can enhance the dish’s overall appeal. When it comes to beverages, opt for unsweetened iced tea, sparkling water with lemon, or a low-carb smoothie made with almond milk and berries to complement the flavors without adding unnecessary sugars or carbs.
FINAL THOUGHTS 🔥
This recipe offers a delicious and satisfying way to enjoy a cheesy, flavorful meal while staying within a low-carb lifestyle. By avoiding common preparation mistakes, selecting high-quality ingredients, and making small modifications to suit dietary preferences or child-friendly options, you can create a dish that is both nutritious and enjoyable.
Whether you’re making these roll-ups for a quick family dinner, a party appetizer, or a meal prep option, they provide versatility and convenience. Pairing them with the right sides and drinks further enhances their appeal, making them a go-to choice for those looking for a low-carb, keto-friendly meal. With the right techniques and ingredient choices, these roll-ups can become a staple in your household, offering a satisfying and wholesome meal option for everyone.
This Garlic Beef Pasta is the perfect combination of bold garlic flavors, tender beef, and a kick of spice. It’s quick to make, packed with protein, and utterly satisfying. Whether you’re cooking for yourself or feeding a family, this dish is bound to become a go-to lunch favorite. Try it today and enjoy a restaurant-quality meal at home! 🍽️
Garlic Beef Pasta,Garlic Beef Pasta,Garlic Beef Pasta,Garlic Beef Pasta,Garlic Beef Pasta,Garlic Beef Pasta